The Annihilator Suit

Upon searching for something to build, I happened to stumble on my old Exo-Force sets from a number of years ago. While Exo-Force was never really my favorite theme, it offered an excellent array of new, strange and fantastic parts, which immediately drew me in. Many of these pieces lent themselves well to large robotic structures (that being the premise of the theme,) so I used them to construct my own attack mech. Personally, I think it turned out quite well, but I'll let you see for yourself.
And here it is: The Annihilator! This monstrosity uses mainly pieces from
the Thunder Fury (7702) but includes parts from a solid eight other sets.

The legs and hips of the model are joined to the torso and shoulders by a rotating
drum, allowing the robot to turn at the waist as well as at standard limb joints.
The bank of guns on the right arm are mounted on two axes of hinges, allowing it
to move quite freely around the underside of the forearm and making for excellent
poseability.

The fuel drums attached to the shoulders are likewise mounted on two hinges, allowing
them to stick out at the desired angle no matter where the shoulder is positioned.

Yes, there is also a pilot! This shot shows the cockpit with only the top panel
hinged up, and the next one shows it fully opened. Note that I mounted the 1x2x3
slope bricks at unusual angles to achieve full closure of the cockpit.
Here is our fearless mech pilot fully revealed. In total, there are six separate cockpit
panels which must be opened individually in order to fully open the pilot's seat.
WARNING: I think this one might be photoshopped.... *might*
But it provides a great picture of the mech as it would appear on duty on an alien planet.
In closing, this one was fun to build, even though it was extremely challenging to get the cockpit panels shaped the way I liked them. I hope that through sharing this model I have provided inspiration or even merely enjoyment; since I like how it turned out, I hope you do as well. Happy Building!


The Lego Americana Roadshow - Totally Awesome!

This past month I had the opportunity to visit Fashion Place Mall in Utah, one of the locations for the traveling Lego Americana Roadshow exhibition. The Roadshow features a dozen massive, highly detailed scale models of some of the most iconic buildings in the United States, including the White House, the Capitol Building, the Supreme Court, the Lincoln and Jefferson memorials and many more. The Roadshow will continue traveling until November of this year, to locations which I will list later. But first, some pictures for your viewing pleasure!
Independence Hall, complete with clocks

The Capitol Building--This one is a monster! It measures over twenty feet wide and six tall,
and detailed down to the window sills. Very Impressive.

Though simple in shape, the Washington Monument is unique in that it measures
over fourteen feet tall, by far the tallest model in the exhibit.

The Liberty Bell--ACTUAL SIZE! It reminded me very much of the time I saw the real thing,
and it's even backlit and therefore very hard to photograph, just like the real thing.

The Supreme Court Building, with myself provided for scale

The Statue of Liberty-- not as tall as the Washington monument,
but incredibly detailed. The brickwork on the pedestal is astounding.

A statue detail on the Supreme Court Building

Notice those same statues in proportion to the rest of the building

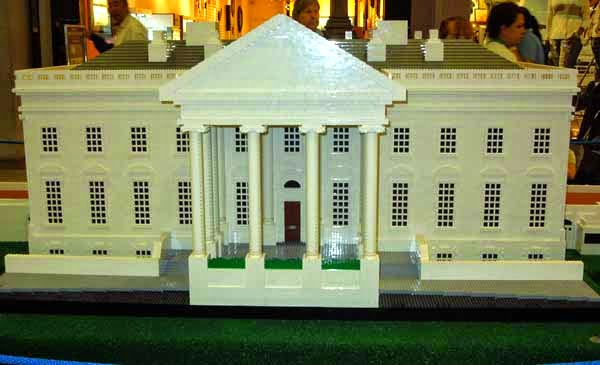
The White House--surprisingly complete with all of the extensions and out-buildings, thereby making it an impressive
feat of construction.
Throughout the exhibit I took the time to study the buildings up close, finding many interesting details and unusual pieces.
Detail from the Supreme Court--Yes, those are croissants. In white. I have no idea how long it took to
round up 200 already-rare white croissants, but somehow they did. Job well done.

Fabric detail from the Statue of Liberty-- it is extremely difficult to make rectangular bricks
look like smooth, flowing fabric, but these master builders definitely delivered!


This is a wall detail from the Old North Church, which is built almost entirely
out of rare dark-tan bricks. Masonry bricks are evenly spaced to look like peeling
paint over brickwork, and a very nice use of a radar dish as a window!
Along with the many famous buildings, there were several tiny displays of seemingly randomly themed scenes involving high quantities of minifigures wreaking havoc on one another.
This is a miniaturized version of the mall where the exhibition was held-- just
look at the tiny Capitol Building in the center!

This one was a space-mining operation. A personal point of
interest is the days-without-accident sign.

This one was a winter scene with a ski lift and a massive snowman construction project.


As stated previously, the Roadshow runs until November, traveling to various locations throughout the United States. The schedule for the remainder of the year is as follows:

Mall Locations:
Stonebriar Mall, Frisco, TX:  May 23 – June 7
Mayfair Mall, Wauwatosa, WI:  June 12 -28
Kenwood Town Center, Cincinnati, OH:  July 3-19
Riverchase Galleria, Hoover, AL:  August 20 – September 7
Northpoint Mall, Alpharetta, GA:  September 17 – October 4
Christiana Mall, Newark, DE:  October 15 – November 1

If you have a chance to get to any of these locations during the exhibition, I highly recommend doing so! These titanic models put a playful and innovative Lego twist on historical icons, and it's almost like touring the East Coast without even going far. Happy Building!

DIY Haunted House

Since the actual Lego Haunted House (10228-1) is no longer available (I tried in September; my order was canceled due to excessive demand for the product), I decided to take matters into my own hands. Noticing that my prized Green Grocer (10185-1) has many of the sand-green pieces used in the official set, I decided it was a prime candidate for sacrifice.

After dismantling the entire modular building (not easy on the fingertips, that), I got to work. Following a further several hours of building, rebuilding and building some more, I was satisfied. I even have the Ghostbusters (21108-1) to lay siege!

Those familiar with the original set will notice that I used many techniques and styling elements from the original set. Indeed I did make some areas structurally similar, but a number of things are pleasingly different. Lacking the shutter pieces that can be mounted at peculiar angles, I resorted to boarding on top of the shuttered windows instead. I was most proud of the third-floor window, which has two boards mounted at opposing angles. Fortunately, I was able to find enough dark-tan 1x2 masonry bricks to achieve the peeling-paint effect from the actual set.
This picture better displays the extra side porch, which also features crumbling steps.
More visible also is the wraparound porch on the second floor, which connects to
the bedroom. I pirated the skeleton-leg-and-hammer railing from the Green Grocer.

This one shows the step detailing of the front porch.

Here is the fully furnished interior, featuring a bed frame, clock, kitchen, bookshelf
and several other details.

Kitchen, fireplace, smokestack, spiderweb and crumbling floor tiles

More tiles, dishware rack, clock, bookshelf, bed frame (with dead guy),
curtains, and boxes and crates on the top floor

The building is built on two plates with hinge plates, opening in a similar fashion to the actual set.
Note also the roof access door.

asd
And lastly, how better to display it than amongst the other modular buildings, with a Ghostbuster invasion to boot?

I had a lot of fun with this one. While I do realize that not everyone has Green Grocer (It's currently much more expensive than the Haunted House, in fact), I think it could be easily done with any number of other buildings. The builder is only limited by his or her own imagination.
 Happy Building!


It's a Wagon!

On July 24 each year, the state of Utah celebrates Pioneer Day. This holiday commemorates the arrival of the first settlers in the Salt Lake Valley in 1847. In Utah, this holiday is a pretty big deal (hence fireworks are legal). For my own celebration of this occasion, I decided to try to build a covered wagon. (This because I didn't have my own; the only one ever produced by Lego was the Covered Weapons Wagon [6716], which is fairly rare nowadays and likewise very expensive.)
I didn't have a massive infrastructure for Western-type models, so I used parts from an array of Castle sets plus anything else I could find. It is drawn by a pair of cows (they look remarkably like oxen) from the Medieval Market Village [10193-1]. The front wheels are mounted on a pivot to allow steering, while the rear wheels are stationary. I think the hardest part was sewing the cover, which is made of actual fabric. The cover is supported by three flexible rods, which feed through sleeves in the fabric and into sockets in the wagon's bed.


The bed of the wagon contains supplies like cups, knives, various food
items, a lantern, a letter, and a book.

The design I used for attaching the flexible rods did not afford much extra
room, but it was sufficient for what I put inside.


Finally, I found a spot of empty dirt out in the garden to do some environment shots, which include other Lego scenery like shrubs, snakes, scorpions, a cow skull and a forgotten wagon wheel. These pictures were the most fun part of the whole model.


I really couldn't resist putting one in black and white. It makes it seem much more historically accurate.

This model, while fairly simple, presented its own challenges and gave me a chance to incorporate fabrics and natural scenery into a project. I hope you enjoy it as much as I did. Happy Building!

Titan and Vindicator Submarines

For undetermined reasons, I recently felt motivated to build a submarine. I have built many submarines over the years--some great, others not so great, and some downright strange. However, this time I felt much more ambitious, so I set about dismantling every Aqua Raiders set in my possession. (Don't get me wrong, I'd rather use Aquazone, but I have a larger infrastructure for the newer sets).

The Titan, like many of my other models, began with the cockpit. The design came from an interesting idea I had, to use the large windscreen panels from the Aquabase Invasion (7775) at angles I hadn't seen before. So, after two days of building, redesigning, rebuilding and brick math (yes, building using opposing angles can take some extra thought) I finally arrived at a model that was sturdy, functional and visually striking. The cockpit features seats and controls for three, along with extra scuba gear.

From the cockpit I started working my way back, building an airlock tunnel, fins, engines, a cargo area and other features. The door to the airlock opens when not otherwise impeded, though it is cramped enough to be pretty impractical during use. The large scaffolding columns along either side were a feature I wanted from the beginning, and built the rest of the model around. Behind the airlock is a small sliding track, on which the tiny submersible craft from set 7775 can be mounted and released out the back of the vessel. I later added hoses and valves (always a nice feature) and decided they may be used to regulate the airlock. There is also a spare air tank nestled between the hoses and scaffolding columns, just barely visible in the picture. Mounted above the cargo track is a Blunt shooter (That's just what I call it; the real name is 'Technic Missile Launcher'), which has a limited range of motion both vertically and horizontally. The propellers are the only pieces not from an Aqua Raiders set, since I didn't have any others bulky enough to suit my needs.


I used the leftover pieces to build a docking pad of sorts, which also doubles as a nice display stand. It isn't terribly flashy, but has some useful things like air tanks, spears, etc. With more bricks I'd love to make a better one, but it was not opportune at the time.

Along with the Titan, I built a much smaller, personal craft which I dubbed the Vindicator. It's a little smaller than the Deep Sea Treasure Hunter (7770) but has all the bells and whistles, namely jets, fins, control panels, spear guns and translucent cones (who knows what those are ever meant to really be?). For this model I toyed with the idea of the pilot merely hanging on, with no actual seat. As a result, there are no exposed studs on the entire craft, making for a sleek, hydrodynamic look. The main spear guns are also locked in place and not removable, which I needed to do in order to have the connection between the jets and the front of the fuselage. (Yes, there are additional spear guns on the bottom for minifig use). It can also be easily attached to a joint and transparent post for display (seen below).


I enjoyed building both of these models, and I intend to build up a large enough collection of classic underwater sets to use those themes as well. In the meantime, Happy Building!

Happy National Robotics Week!

April 5-13 2014 will be the fifth annual National Robotics Week.The event is recognized in many different ways, often by the holding of a robotics-related activity or event. For details and information about events nationwide, visit the Robotics Week site.
The purpose of the event according to the official website is as follows:
  • Celebrate the US as a leader in robotics technology development
  • Educate the public about how robotics technology impacts society, both now and in the future
  • Advocate for increased funding for robotics technology research and development
  • Inspire students of all ages to pursue careers in robotics and other Science, Technology, Engineering, and Math-related fields
You may notice that this is only the fifth year in which this event has taken place. In fact, it only became nationally recognized in Congress on March 9, 2010 in House Resolution 1055, "Supporting the designation of National Robotics Week as an annual event." In fact, the resolution attributes the purpose of the event to renowned science fiction author Isaac Asimov, as stated below:
 "Whereas the second week in April each year is designated as 'National Robotics Week', recognizing the accomplishments of Isaac Asimov, who immigrated to America, taught science, wrote science books for children and adults, first used the term robotics, developed the Three Laws of Robotics, and died in April, 1992: Now, therefore, be it resolved..."
In preparation and celebration of this week, I have not only been working with my Lego Mindstorms sets, but also reading several of Asimov's sci-fi novels. I encourage everyone to find their own ways of commemorating this week, whether through reading, building, or attendance of an event. Happy Building!
DARPA's  Atlas robot, which is being developed for rescue applications.

Popsicle Stick Ballista

Popsicle sticks are a versatile building material. They can be used to make things like bridges, lamp shades, and most importantly siege engines. I have built multiple miniature weapons with these sticks before, such as catapults, trebuchets, and siege towers. However, only recently did it occur to me to try a ballista.

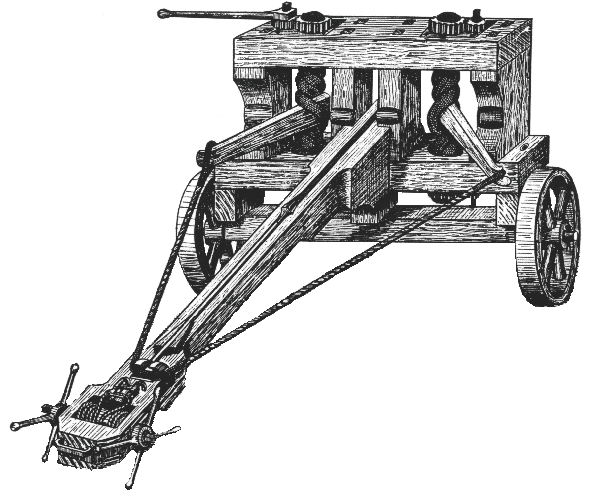
A ballista is a stationary ranged weapon that is in many respects similar to a crossbow. They were made in all sizes and forms, but they all share the same function: launch bolts at the enemy. They get their power from torsion coils, which the arms of the bow are attached to, and most often they have a winch for winding up the weapon.
Sketch of an ancient ballista
I cannot take all of the credit for this project myself. I made several of my own adaptations, but I got the basic plans from Storm The Castle, an excellent site for all your medieval-warfare-related needs. The instructions for this project can be found here. Meanwhile, this is how mine turned out. (This pictures do not show the base for the machine). It works very well, successfully shooting its makeshift bolt several feet, with a surprising amount of force for such a small construction.
Isometric view, with the string drawn

Rear view
If you are going to attempt this project, I recommend letting the glue dry for several hours or overnight before stringing it up. Also, USE STRONG STRING. I ended up snapping a few torsion coils before it finally worked. Enjoy!